Single Sign On - SAML
note: SAML SSO is available for free for customers on Business and Enterprise plans. Other plans can add-on SSO with an additional $50/month fee.
Single sign on (SSO) offers Raygun users a way to sign in & authenticate using third-party providers to suit your organisation.
Raygun currently supports two types of SSO, SAML & Basic.
We support the SAML2 (Security Assertion Markup Language) standard for authenticating users and logging them into the application.
Initial set up
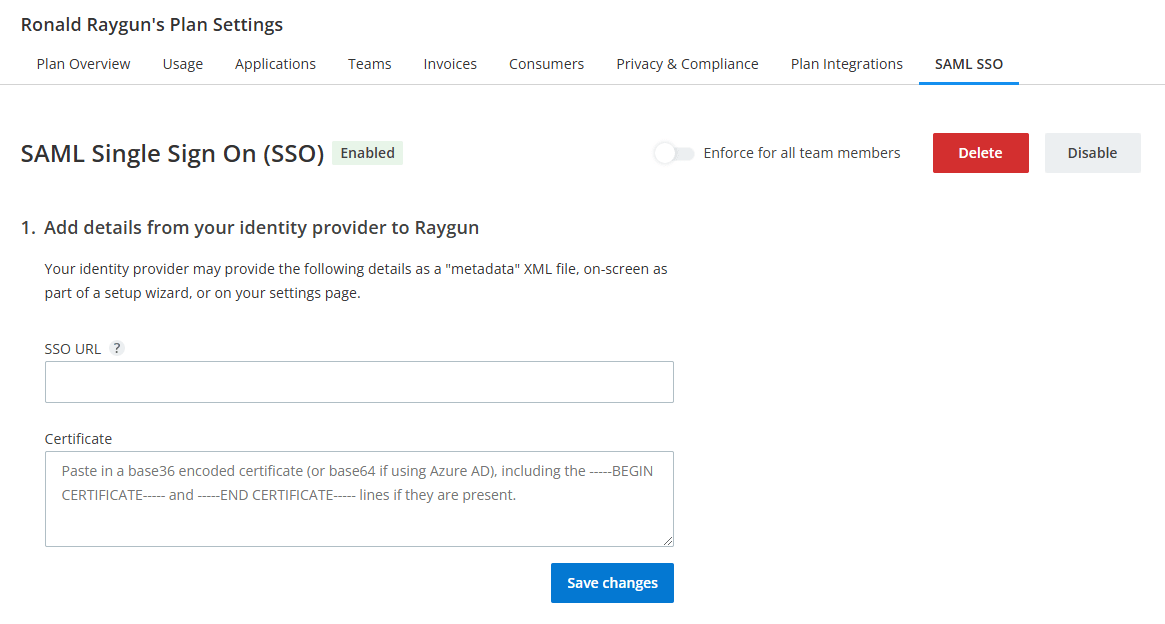
To get your plan integrated with Raygun SAML SSO, head to the SAML Single Sign On (SSO) page within the Plan Settings area.

From here, you will be given a set of instructions to follow:
- Add details from your identity provider to Raygun - Add your identified SSO URL and certifcate
- Configure SSO settings in your identity provider - Add configurations within your identity provider to complete the connection between our systems and your chosen identity provider
When signing in using SSO you will be redirected to your identity provider (e.g. G-Suite), where you may need to complete additional steps (e.g. selecting the authenticating account) before being redirected back to Raygun. Continue reading our documentation on how to configure the additional pieces based on your chosen provider.
Once integration has been completed, users can log in to Raygun using SSO by either using the "Sign in with SSO" link from the sign in page or by using the custom endpoint that we will have supplied for you during the integration process (the Entity ID).
If you have two-factor authentication applied to your account, you will still need to supply an authentication token before completing the authentication process.
Additional configuration
Raygun requires additional configuration for the follow providers -
- OKTA
- Jumpcloud
- Active Directory Federation Services (ADFS)
- Azure Active Directory/Microsoft Entra ID
- G-Suite
OKTA configuration
If you are looking to configure with OKTA, you will need to set up a custom OKTA SSO app.
Once that is complete, there are also some specific "Advanced settings" that need to be changed from the defaults.
Under the "Show Advanced Settings", you'll need to assign these fields with the following values -
- Response = Unsigned
- Assertion Signature = Signed
- Authentication context class = Unspecified
JumpCloud configuration
If you are configuring with JumpCloud, you will need to have the "Sign assertion" checkbox ticked within their Single Sign On configuration options within their Jumpcloud application.
Active Directory Federation Services (ADFS) configuration
If you are configuring with ADFS, to find the endpoint URL in a provided XML file, open the XML file in an IDE and auto-format it. Copy the Location property value of this element:
<SingleSignOnService Binding="urn:oasis:names:tc:SAML:2.0:bindings:HTTP-Redirect"Location="https://adfs.[company_name].com/adfs/ls/"/>
Azure Active Directory/Microsoft Entra ID configuration
If you are configuring with Azure Active Directory/Microsoft Entra ID, you will need the following settings applied in your app -
- Unique User ID:
user.userprinciplename - Sign SAML assertion only (do not sign response)
- Have ADFS installed to support SAML2.
G-Suite configuration
If you are configuring with G-suite, G-Suite already signs the assertions, ensure that the checkbox in G-Suite is not check for "Signed response". This will sign the whole response, which will make it incompatiable with Raygun.
Provisioning and de-provisioning team members
Currently, we support auto provisioning users. As long as the identity provider has specified the particular users have access to Raygun via their identity provider.
For customers using SSO, a Raygun account will be automatically created when signing in via your identity provider for the first time. The account used will be associated with their SSO credentials as we match both account emails after they log in. This is so that we have an identical record on our end to assign user activities with.
For de-provisioning users from the system, you can either contact us to delete the Raygun user account, or remove the team member from the user's team in your Raygun account. Ensure that the user no longer has access to Raygun within the identity provider as well.
Disable/enable
If you wish to disable SSO without removing the creditials, simply click 'Disable' in the top right of the SSO page. To re-enable SSO, click the 'Enable' button in the top right of the SSO page.
Enforce SSO for all users
If you would like to ensure all users on your team must authenticate through your single sign on provider, you can apply this policy to your account via the SSO set up page.
First, ensure that everyone on your plan can successfully authenticate via SSO. Doing so will ensure users are not locked out of their account when SSO is enforced.
Once the above is validated, toggle the 'Enforce for all team members' button on the SSO page and confirm the action. This policy will be applied immediately to the organization.
If you get locked out, don't hesistate to reach out to us via our contact us page.
Delete SSO details
To delete the SSO configuration from the system, simply click the 'Delete' button and confirm the action. This will be applied immediately.
Troubleshooting
- It's common for a certificate to expire. Ensure that your certificate is up to date by updating it via the form provided.
- The certificate should be base 64 encoded and will contain a
-----BEGIN CERTIFICATE-----line and a-----END CERTIFICATE-----which is required on our end - If you require a Signature Verification Certificate, please contact us.
Other standard reasons for being rejected are:
- The message was not signed with the public key we have on file
- The user is not associated with the organization in Raygun
- The user does not exist in our system
- The response message did not contain an email address
note: If during the set up of SSO, you get locked out and are unsure what steps to take, don't hesistate to reach out to us via our contact us page.