Postman best practices: How Raygun’s engineering team uses Postman to improve our API workflow
Posted Dec 13, 2017 | 10 min. (1953 words)When developing our performance monitoring platform Raygun, I often need to send data to the Raygun ingestion API running in the local environment. To help keep my API management at it’s most efficient, I (along with quite a lot of our engineering team) use a tool called Postman. Since is such an essential part of my workflow, I’d like to share these Postman best practices.
Looking to improve your workflow?
Why Postman?
Sending data to the API quickly and efficiently helps when I’m working on features and bug fixes in almost any part of Raygun. Whether I’m working on the API and ingestion pipeline or the way the Raygun app displays data, Postman is an essential part of the process.
In this post, I’m going to share my favorite features of Postman, a few best practices and how I use Postman in my engineering team here at Raygun to make work on new features and bug fixes much quicker.
General usage
Firstly, for anyone new to Postman, here’s a quick look at the basic usage.

Above, I’ve created a new request in Postman and filled it in to POST a new ‘session start’ event to my local Raygun RUM ingestion endpoint. In the top left is the verb which you can click to select from the drop-down. Next to this is the URL of the API to communicate with. The ‘Params’ button will cause a table to appear where you can add query string parameters as convenient key-value pairs, though including them in the URL works fine too if you wish.
Below the URL is a set of tabs. Here, you can edit the payload body and add headers. There are a few different payload type options. I usually just work with the raw type, which has further subtypes such as plain text or Json. In the headers tab, I’ve set the Raygun application API key, and Postman has added the Content-Type header to ‘application/json’ for me based on my payload set up.
With everything ready, click the blue ‘Send’ button to push it off to the API. The section below your set up will update to display the response. Below, you can see I get a ‘202 Accepted’. If something goes wrong, you should use the status error code and any other information that the API returns which Postman will display for you.

Collections
Anytime you send a request, Postman logs it in the ‘History’ tab, which is displayed on the far left-hand panel of Postman’s dashboard.

You can click any of these requests in your history to modify and send them again. Back when I first started using Postman and only had a handful of requests, this was the extent of how I used Postman. After adding many more requests, scrolling through the history to find a request that I wanted to replay was no longer feasible.
As you would expect, Postman provides a way to save requests, which you can organize into folders called ‘Collections’. These collections can have further subfolders to help organize large groups of requests. There are a few places in the UI where you can save a request. I usually use the ‘Save’ button that you will find next to the ‘Send’ button. Just remember, if you are editing an existing saved request to create and save a new one, make sure to hit the arrow next to the ‘Save’ button so that you can ‘Save As’.

Give your request a meaningful name, then select or create a collection. Add it to the collection, and click ‘Save.’ Postman displays the collections in the far left panel, next to the ‘History’ tab. This makes it so easy to find and resend the various types of requests that I work with in my day-to-day.

Environments
Postman can send requests to any API it has access to, so you’re not limited your local environment. After I’m happy that things are working locally, I deploy and test in our Office environment, before deploying and verifying that things are working in Production. This can mean sending the same test payloads that I was using locally to both the Office and Production environments. To do this, I can just navigate to the payloads in Postman, change the URL to point to the endpoint in the appropriate environment and hit ‘Send’.
Changing the URL can get tedious and error-prone when sending many different payloads to the various environments. Postman provides a way to do this work for you, condensing this task down to a simple drop down to switch between environments for all requests at once. You’ll need to spend a few minutes setting this up at first but will be worth it for requests that you frequently work with.
To get started, click the orange ‘New’ button in the top left corner of Postman or the arrow next to it, and then select ‘Environment.’

Essentially, an environment in Postman is a set of key-value variables. These variables are the values that will be different within your requests across each environment. Below is an example of my local environment.

A single environment is somewhat useless. After setting up your first environment, make sure to add any others that you’ll be working with. Each environment should be set up with the same named variables, as each has their environment-specific values. To use a variable, surround the variable name in double curly brackets ({{}}) like in the example below with the URL.

With all that setup, you’ll see a drop-down button near the top right corner of Postman where you can switch between your environments. Any request that you send will use the variables from the currently selected environment. If you need to add, remove or edit your environment variables, click the cog next to the Environment switcher and then press ‘Manage Environments.’
Global variables
In Raygun, you can create ‘applications’ which are logical buckets where data is sent to. Each application has an API key so that data sent to the API can find its way to the intended application. I have the same applications set up across the various environments, and so generally send particular payloads to the same application regardless of environment, hence why I haven’t added the API key as an environment variable.
Now and then, however, I do want to test the same set of payloads in a different application—and so need to change the API key header in each payload. For this, I set up a global variable. To do this, click the cog icon next to the environment switcher and choose ‘Manage Environment’ to display a list of environments you’ve set up.

At the bottom of this list is a button called ‘Globals’. Click this to view a page that looks very similar to editing an Environment. Here, you can add key-value variables which are available regardless of the environment. As shown below, Postman uses global variables in the same way as environment variables.

When I need to send payloads to a different app, I can edit the global variable. Regardless, it’s nice to keep the API keys in one place. Here are some more API design guidelines.
A recent update of Postman (5.4.1) has introduced collection/folder scoped variables. Variables are helpful when the global scope is too high and you want to limit variables to a subset of requests.
Pre-request scripts
All payloads sent to Raygun contain a timestamp. When testing, I often need to make sure that this timestamp is the current time so that when the data appears in the Raygun app, I can easily find it. The timestamp is in UTC, so I need to consider timezone and daylight savings, and then update the timestamp every time I send a request. Another tedious task that you can get the computer to take over. We’re going to automate this using a ‘Pre-request Script’ in Postman.
How to automate the timestamp update in Postman
You can set up scripts at various scopes: request, folder, and collection. (To follow along, make sure your Postman is at 5.4.1 or later). As mentioned, the timestamp exists in all requests sent to Raygun. Therefore, I want the script to be at the highest possible scope. There isn’t a global scope, unfortunately, so the collection scope is going to have to do.
In the Collections pane, hover over a collection to cause a ‘…’ button to appear. Click this, and then select ‘Edit’ in the popup menu.
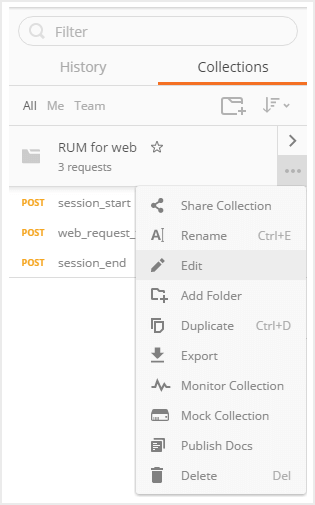
In the ‘Edit Collection’ window that opens, click the ‘Pre-request Scripts’ tab underneath the collection name. Paste the following script into the edit box.
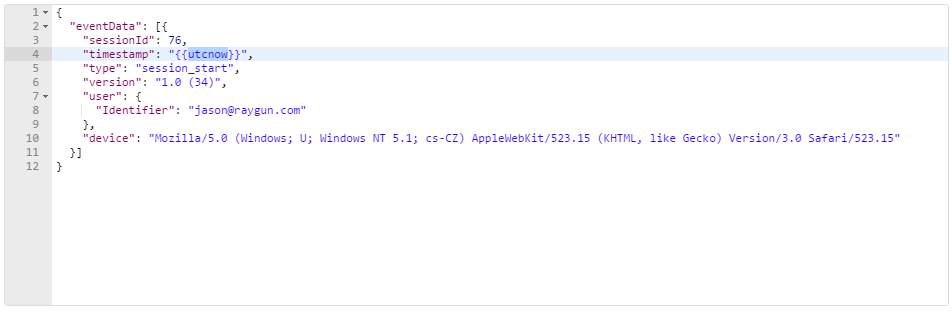
var date = new Date().toISOString();
pm.globals.set("utcnow", date);
This gets the current UTC date time and sets the value into a global variable. You can then use the variable in the various request payloads.
So far, the only thing you need to edit when sending RUM payloads to Raygun environments is the session ID. The session ID is used in all three different types of RUM payloads. It groups all the data together for each unique session. How it works is that when a Raygun provider is running in a real-world application, it will generate a unique session ID. Any time that a session-start event occurs, Raygun creates a new session ID. Subsequent page-timing events or the session-end event will use this same session ID until a new session-start event occurs. Therefore, maybe you can use a Postman Pre-request Script to get this same behavior?
Postman provides a guid variable which is ideal and matches what the Raygun providers use. You only want a guid to generate on a session-start request, and then persist across subsequent page-timing and session-end events. Unfortunately, it seems that the Postman can’t store the guid as a variable. Fortunately, we’re not limited to using guids. Raygun accepts any unique string to distinguish a session, which gives us a lot of options. I usually just use a number and increment it when I start a new session, so let’s script that up.
How to set up the script
First, you need to manually add a global variable to start the count. Following what I mentioned above about global variables, I’ve added one called “webSessionId”. Next, I navigate to my saved session_start request and switch to the “Pre-request Script” tab next to the “Body” tab. (Which you may have noticed in some of the previous screenshots). In the script, I want to simply get the current webSessionId value, increment it by 1, then save it back.
var previousId = pm.globals.get("webSessionId");
pm.globals.set("webSessionId", previousId + 1);
Finally, I can update all three saved payloads to use the {{webSessionId}} variable in place of the manual number I was previously using. Done. Now, I only ever need to edit bits of the payload based on what I’m testing at the time. Any more changes, from environment differences to the timestamp and unique session ID, are automatically performed as part of the normal Postman usage. That is, pressing the ‘Send’ button.
You can read more about Postman scripts in the official documentation.
Use these Postman best practices in your development workflow
Do any of these best practices fit into your workflow setup? If so, have a go at setting Postman up right now. A few minutes now could save a lot of tedium in the long run. This has been a look at my favorite Postman features. There are many other great features like support for various authentication techniques, test scripts, and the collection runner. Along with its simple and good looking UI, Postman is one of the best tools in my workflow.