JavaScript unit testing frameworks in 2024: A comparison
Posted Jan 6, 2024 | 15 min. (3183 words)Choosing a JavaScript unit testing framework is an essential early step for any new front-end development project.
Unit tests are great for peace of mind and reducing software errors. You should always make the time to test.
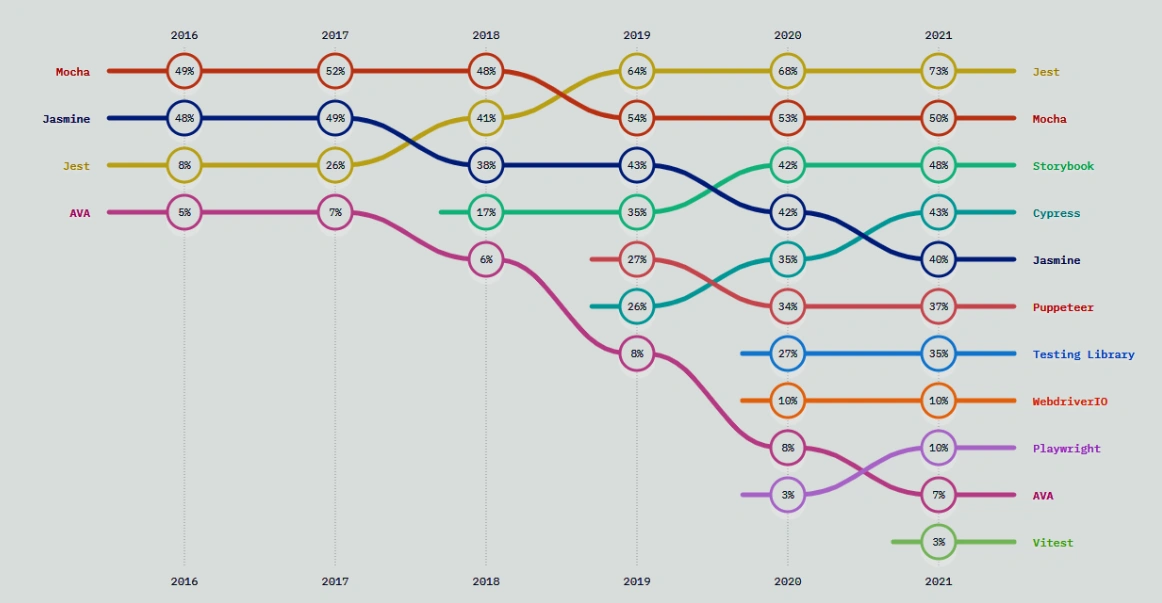
But which framework should you choose for your project? We examined 11 of the most popular JavaScript unit testing frameworks according to stateofjs.com, to help you decide which is best for you.
Stateofjs collects data from thousands of front-end developers in its annual surveys. Here’s their ranking of the most popular JS testing frameworks, sorted by their usage. We’ll go over them one by one, and try to understand their pros and cons.
JavaScript moves fast, but JavaScript developers move even faster! As JavaScript keeps evolving, new tools are introduced and may outperform their ancestors. That’s why we should always keep an eye on the changes and choose the framework that fits best in our development process.
In this post:
- Jest
- Mocha
- Storybook
- Cypress
- Jasmine
- Puppeteer
- Testing Library (react)
- Webdriver io
- Playwright
- Ava
- Vitest
Jest
![]()
Used and recommended by Facebook, Jest is officially supported by the React dev team. If you’ve been a programmer even for just a couple of years, you’ll understand how important it is to choose a framework with a strong community and active support. When a tool is also backed up by a giant like Meta, there’s considerable extra comfort and peace of mind. This simply means if you run into a problem and couldn’t find a solution in their comprehensive documentation, there are thousands of developers out there who could help you figure it out within hours – if not minutes.
Sample code:
const sum = require(‘./sum’);

test(‘adds 1 + 2 to equal 3’, () => {
  expect(sum(1, 2)).toBe(3);
});
}
Pros
- Performance. For smaller projects, you might not worry about this too much initially, but increased performance is great for larger projects wanting to continuously deploy their app throughout the day
- Compatibility. Whilst developers primarily use Jest to test React applications, Jest can easily integrate into other applications, allowing you to use its more unique features elsewhere. It’s compatible with Angular, Node, Vue and other babel-based projects.
- Auto Mocking. When you import your libs in your test files, Jest auto-mocks those libraries to help you work with them more easily and avoid boilerplate.
- Extended API. Unlike other libraries on the list, Jest comes with a wide API, not requiring you to include additional libraries unless you really need to.
- Timer Mocks. Jest features a Time mocking system which is great for fast-forwarding timeouts in the app and helps save time when your tests are run.
- Active development & Community. Jest improves with every update, and as mentioned before, has the most active community, which helps you reach solutions fast when you’re most in need.
Cons
- Slow runtime due to auto-mocking. While auto-mocking has been considered an advantage in the past, it could also turn into a negative from a testing standpoint, since it auto-wraps all your libraries and therefore makes your tests run a bit slower.
Mocha
![]()
The second most-used library, Mocha is only a test framework and provides developers with just the base test structure. Mocha was designed originally to work with Node.js, but today works on a large range of frameworks – including front-end frameworks such as React, Vue, and Angular, as long as you are willing to get your hands dirty with a bit of config.
It does not support assertions, spies and mocks out of the box but it’s possible to add these functionalities with add-ons/plugins. The most popular choice of assertion library to pair with Mocha is Chai, but other options are Assert, Should.js and Better-assert.
Sample code:
var assert = require(‘assert’);
describe(‘Array’, function () {
  describe(‘#indexOf()’, function () {
    it(‘should return -1 when the value is not present’, function () {
      assert.equal([1, 2, 3].indexOf(4), -1);
    });
  });
});
Pros
- Lightweight and Simple. For smaller projects which don’t include sophisticated assertions or testing logic, Mocha is a simple solution.
- Flexible Configuration. If you want flexible configuration, including your preferred libraries, then the additional set-up and configuration of Mocha is something you definitely need to check out.
- ES module Support. Mocha supports writing your tests as ES modules, and not just using CommonJS. (Using
importalong with usingrequire)
Cons
- Harder to set up. You have to include additional libraries for assertions, and this does mean that it’s a little harder to set up than others. That said, set-up is generally a one-time deal, but it’s nice to be able to refer to a “single source of truth” (documentation) instead of jumping all over the show.
- Potential inconsistency with plugins. Mocha includes the test structure as globals, saving time by not having to
includeorrequireit in every file. The downside is that plugins just might require you to include these anyway, leading to inconsistencies, and if you’re a perfectionist it can be frustrating! - Weaker documentation. Reportedly, Mocha’s documentation is not its strength.
- No support for Arbitrary transpiler. Up until v6.0.0, Mocha had a feature which allowed you to use an arbitrary transpiler like coffee-script etc, but it’s now deprecated.
Storybook
Unlike other JS testing frameworks, Storybook is more of a UI testing tool. It provides an isolated environment for testing components. Stories make it easy to explore a component in all its variations, regardless of its complexity. That means stories are a practical starting point for your UI testing strategy. You already write stories as a natural part of UI development, testing those stories is an easy way to prevent UI bugs over time. Storybook also comes with tools, test runners, and handy integrations with the larger JavaScript ecosystem to expand your UI test coverage.
There are multiple ways you can use Storybook for UI testing:
- Visual tests capture a screenshot of every story then compare it against baselines to detect appearance and integration issues
- Accessibility tests catch usability issues related to visual, hearing, mobility, cognitive, speech, or neurological disabilities
- Interaction tests verify component functionality by simulating user behavior, firing events, and ensuring that state is updated as expected
- Snapshot tests detect changes in the rendered markup to surface rendering errors or warnings
- Import stories in other tests to QA even more UI characteristics
It’s tough to directly compare Storybook to our other testing frameworks, so if this sounds useful for your project, we’d encourage you to do a bit more research of your own.
Cypress
Cypress works entirely in a real browser (Chrome, Firefox and Edge) without the need for driver binaries. Automated code and application code share the same platform and give you complete control over the application under test. Cypress is best known for its E2E (End to end) testing capability, meaning you can follow a pre-defined user behavior and have this tool report potential differences each time you deploy new code.
Sample code:
describe(‘Actions’, () => {
  beforeEach(() => {
    cy.visit(‘https://example.cypress.io/commands/actions’)
  })

  // https://on.cypress.io/interacting-with-elements

  it(‘.type() – type into a DOM element’, () => {
    // https://on.cypress.io/type
    cy.get(‘.action-email’)
      .type(‘fake@email.com’).should(‘have.value’, ‘fake@email.com’)

      // .type() with special character sequences
      .type(‘{leftarrow}{rightarrow}{uparrow}{downarrow}’)
      .type(‘{del}{selectall}{backspace}’)

      // .type() with key modifiers
      .type(‘{alt}{option}’) //these are equivalent
      .type(‘{shift}’)

      // Delay each keypress by 0.1 sec
      .type(‘slow.typing@email.com’, { delay: 100 })
      .should(‘have.value’, ‘slow.typing@email.com’)

    cy.get(‘.action-disabled’)
      // Ignore error checking prior to type
      // like whether the input is visible or disabled
      .type(‘disabled error checking’, { force: true })
      .should(‘have.value’, ‘disabled error checking’)
  })

  it(‘.focus() – focus on a DOM element’, () => {
    // https://on.cypress.io/focus
    cy.get(‘.action-focus’).focus()
      .should(‘have.class’, ‘focus’)
      .prev().should(‘have.attr’, ‘style’, ‘color: orange;’)
  })
}
Pros
- E2E Testing. Since Cypress is run in a real browser it can be relied on for end to end user testing.
- Timeline Snapshot Testing. At the time of execution, Cypress takes a snapshot of that moment and will allow the developer or QA tester to review what happened at a particular step
- Steady and Dependable. Cypress gives a steady and dependable test execution result compared to other js testing frameworks.
- Documentation. From zero to run, Cypress contains all the necessary information to get you up to speed. It also has a thriving community.
- Fast. Test execution is fast in Cypress, with a response time of less than 20ms.
Cons
- No multi-browser. Cypress can only run tests in a single browser.
Jasmine
![]()
Jasmine is a popular testing framework which is famously used as a behavior-driven development (BDD) tool. BDD involves writing tests before you write the actual code (as opposed to Test driven development (TDD)). Although Jasmine isn’t just for writing JS tests, and can also be used by other programming languages like Ruby (via Jasmine-gem) or Python (via Jsmin-py), it has lost some of its popularity over the years. It’s DOM-less, which means it does not rely on browsers to run.
Sample Code:
describe(“helloWorld”, () => {
    it(“returns hello world”, () => {
      var actual = helloWorld();
      expect(actual).toBe(“hello world”);
    });
  })
Pros
- Straightforward API. It provides a clean and easy-to-understand syntax, and also a rich and straightforward API for writing your unit tests.
- Batteries also included. There’s no need for additional assertion or mocking libraries — Jasmine has them all out of the box. Fast. Since it doesn’t rely on any external libraries it’s relatively fast.
Cons
- Polluting global environment. It creates test Globals (keywords like “describe” or “test”) by default, so that you don’t have to import them in your tests. This may become a downside in specific scenarios.
- Challenging async testing. Testing asynchronous functions is a bit hard with Jasmine.
Puppeteer
![]()
Puppeteer is a Node library developed by Chrome’s Development Team. It’s a framework for test execution, that enables users to control a headless Chrome. Everything you can do manually in a browser can be also done with Puppeteer.
Most people use this tool to perform several different tests on web applications like:
- Generating screenshots and PDFs out of web pages
- Crawling webpages
- Automating UI testing, keyboard input simulation and form submissions
- Testing chrome extensions
Since Puppeteer is a headless but full-fledged browser, it’s an ideal choice for testing UI of Single Page Applications (SPAs).
Sample Code:
const puppeteer = require('puppeteer');

(async () => {
  const browser = await puppeteer.launch();
  const page = await browser.newPage();
  await page.goto('https://example.com');
  await page.screenshot({ path: 'example.png' });

  await browser.close();
})();
Testing Library [React]
React Testing library is not a test runner like Jest. In fact, they can work in tandem. Testing Library is a set of tools and functions which help you access DOM and perform actions on them, ie rendering components into Virtual DOM, searching and interacting with it.
In some ways, Jest and other traditional testing frameworks aren’t comparable with Testing Library. You need Jest in order to be able to collect all the test files with.test.js extension, run each, and show pass/failed results. It’s more accurate to compare Testing Library with Enzym or Cypress.
Sample code:
import React, {useEffect} from ‘react’
import ReactDOM from ‘react-dom’
import {render, fireEvent} from ‘@testing-library/react’

const modalRoot = document.createElement(‘div’)
modalRoot.setAttribute(‘id’, ‘modal-root’)
document.body.appendChild(modalRoot)

const Modal = ({onClose, children}) => {
  const el = document.createElement(‘div’)

  useEffect(() => {
    modalRoot.appendChild(el)

    return () => modalRoot.removeChild(el)
  })

  return ReactDOM.createPortal(
    <div onClick={onClose}>
      <div onClick={e => e.stopPropagation()}>
        {children}
        <hr />
        <button onClick={onClose}>Close</button>
      </div>
    </div>,
    el,
  )
}

test(‘modal shows the children and a close button’, () => {
  // Arrange
  const handleClose = jest.fn()

  // Act
  const {getByText} = render(
    <Modal onClose={handleClose}>
      <div>test</div>
    </Modal>,
  )
  // Assert
  expect(getByText(‘test’)).toBeTruthy()

  // Act
  fireEvent.click(getByText(/close/i))

  // Assert
  expect(handleClose).toHaveBeenCalledTimes(1)
})
Pros
- Recommended by React Team. You can find references and recommendations for using this library in React’s documentation.
- Lightweight. Since it’s specifically written for testing React apps/components.
- Community. Testing Library is getting some really good traction recently. As a matter of fact, stackoverflow.com stats are showing the volume of questions about Testing Library has outgrown enzyme. img
Cons
- No Shallow Rendering. It doesn’t provide a way to “shallowly” render your component without its children, but you can achieve this by “mocking” features of testing frameworks like Jest.
WebdriverIO
Webdriver IO is an automation framework for Web and mobile applications. It helps you create a concrete, scalable and stable test suite. The main difference between WebdriverIO and the others we went over earlier in this article is that it can be used to test hybrid, native mobile applications, and native desktop applications along with Web applications. The whole package! WebdriverIO leverages the power of the WebDriver protocol that is developed and supported by all browser vendors and guarantees a true cross-browser testing experience. It relies on a common automation standard that is properly tested and ensures compatibility for the future. This standard allows WebdriverIO to work with any browser, regardless of how it is configured or used.
Sample Code:
it('can handle commands using async/await', async function () {
    const inputElement = await $('#input')
    let value = await inputElement.getValue()
    console.log(value) // outputs: some value
})
Pros
- Multi-Platform. It enables running tests on desktop as well as on mobile.
- Compatibility. Works with many assertion libraries and testing frameworks (Jasmine, Mocha, Cucumber)
- Simple and fast. For the all the above reasons.
Cons
- Hard to debug. Debugging is possible only through WDIO task runner
- Documentation. At the time of writing, doesn’t have the best documentation and some APIs are missing.
Playwright

Playwright is another automation framework that works best for E2E testing. This framework is built and maintained by Microsoft and aims to run across the major browser engines – Chromium, Webkit, and Firefox.
It’s actually a fork of an earlier project, Puppeteer (which we went over above). The main difference is that Playwright is specifically written for making E2E tests by developers and testers. Playwright can also be used with major CI/CD servers like TravisCI, CircleCI, Jenkins, Appveyor, GitHub Actions, etc.
Sample Code:
import { test, expect } from '@playwright/test';

test('my test', async ({ page }) => {
  await page.goto('https://playwright.dev/');

  // Expect a title "to contain" a substring.
  await expect(page).toHaveTitle(/Playwright/);

  // Expect an attribute "to be strictly equal" to the value.
  await expect(page.locator('text=Get Started').first()).toHaveAttribute('href', '/docs/intro');

  await page.click('text=Get Started');
  // Expect some text to be visible on the page.
  await expect(page.locator('text=Introduction').first()).toBeVisible();
});
Pros
- Backed up by a trusted company. It’s maintained and supported by Microsoft.
- Multi-Language. Playwright supports multiple languages such as JavaScript, Java, Python, and .NET C#
- Multiple Test Runner Support: Can be used by Mocha, Jest and Jasmine.
- Cross-browser. The main goal for this framework is to support all major browsers.
- Emulating and Native Events Support. Can emulate mobile devices, geolocation, and permissions. Also tapping into native input events for mouse and keyboard is supported.
Cons
- Still early-stage. It’s fairly new and the support from the community is limited
- No real device support: Doesn’t support real devices for mobile browser tests but supports emulators.
AVA
![]()
A minimalistic testing runner, AVA takes advantage of JavaScript’s async nature and runs tests concurrently, which, in turn, increases performance.
AVA doesn’t create any Globals for you, so you can control more easily what you use. This can bring extra clarity to tests, ensuring that you know exactly what is happening.
Sample Code:
import test from 'ava';

test('foo', t => {
	t.pass();
});

test('bar', async t => {
	const bar = Promise.resolve('bar');
	t.is(await bar, 'bar');
});
Pros
- Runs tests concurrently. Taking advantage of the async nature of JavaScript makes testing extremely beneficial. The main benefit is minimizing the wait time between deployments
- Simple API. Contains a simple API that provides only what you need
- Snapshot testing. Provided via jest-snapshot, which is great when you want to know when your application’s UI changes unexpectedly.
- Tap Reporter: Ava shows a human readable report by default but it’s nice to get a report in TAP format!
Cons
- No test grouping. There’s no way in Ava to group similar tests together.
- No built-in mocking. Ava is not shipped with mocking but you can still use third-party libraries for that (like Sinon.js).
Vitest
Made by the team behind Vite, Vitest is a native test runner which provides a compatible API that allows developers to use it as a drop-in replacement of Jest in most projects.
Vitest cares a lot about performance and uses Worker threads to run as much as possible in parallel, bringing the best developer experience. It stays lightweight by carefully choosing its dependencies (or directly inlining needed pieces).
This framework aims to position itself as the Test Runner of choice for Vite projects, and as a solid alternative even for projects not using Vite. The team has provided a comparison page which shows you the differences between this tool and the most-used test runners like Jest or Cypress.
Sample code:
import { assert, expect, test } from 'vitest'

// Edit an assertion and save to see HMR in action

test('Math.sqrt()', () => {
  expect(Math.sqrt(4)).toBe(2)
  expect(Math.sqrt(144)).toBe(12)
  expect(Math.sqrt(2)).toBe(Math.SQRT2)
})

test('JSON', () => {
  const input = {
    foo: 'hello',
    bar: 'world',
  }

  const output = JSON.stringify(input)

  expect(output).eq('{"foo":"hello","bar":"world"}')
  assert.deepEqual(JSON.parse(output), input, 'matches original')
})
Pros
- Native ESM support. That means you can benefit from native browser support for importing ESM modules.
- Typescript support. Vitest supports both Typescript and JSX out of the box.
- Multi-threaded. It brings you the best DX with workers multi-threading via tinypool.
- In-source testing. Vitest provides a way to run tests within your source code along with the implementation, similar to Rust’s module tests.
Cons
- In early adoption phase. Although the team behind Vitest has done a tremendous job on creating this tool, it’s still young and the community support may not be what you’re hoping for.
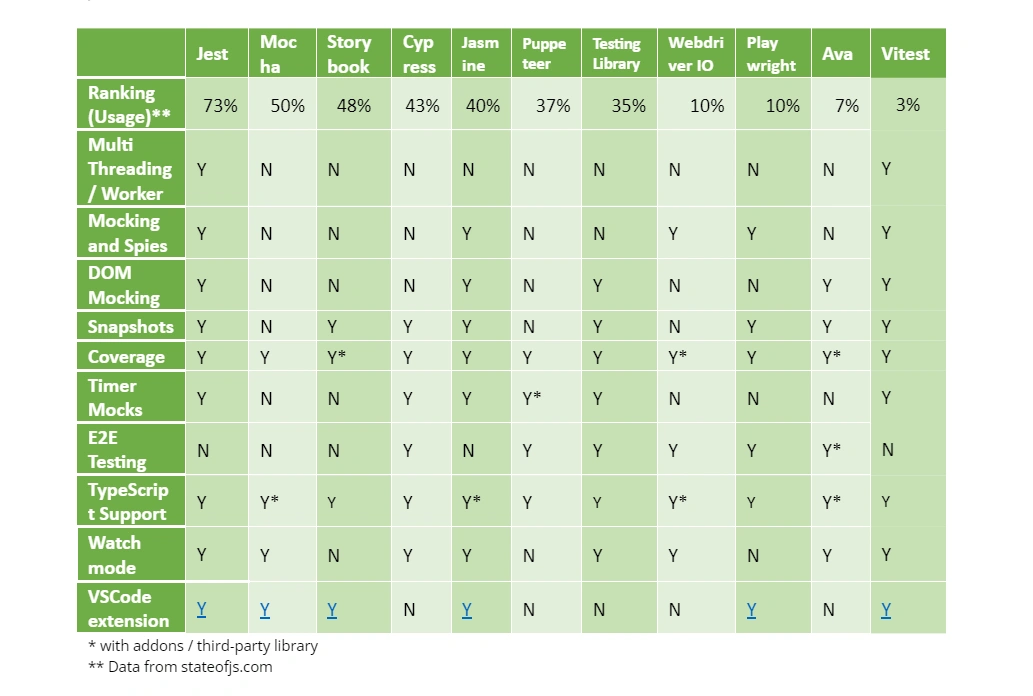
Bonus overview
Here’s a comparison table consisting of common characteristics of all of these frameworks, to help you figure out which is the best for your specific testing case:
Which JavaScript testing framework should I use?
After looking at just a few of the many frameworks out there, it’s pretty clear that choosing a framework isn’t black and white.
Most frameworks (Mocha being the exception) provide the essentials, which is a testing environment along with the mechanisms to ensure that given X, Y is always returned, with a few simply giving you more “bells and whistles.” So for the basics, you should feel pretty confident in choosing any of them, with any further preference depending on what you and your particular project want and need.
If you’re new to the game and need a lot of help getting up to speed, you should choose frameworks with strong communities like Jest. If you require a broad API along with specific (perhaps unique) features then Mocha is a smart choice, as the extensibility is there. And if your tests are mostly E2E, then you can choose between Cypress, Puppeteer or Playwright.
Please also note that if a library is new and doesn’t have a strong community at the moment, it doesn’t mean this will always be the case. Be sure to check them out from time to time. The JavaScript world is changing every day! Here’s hoping this article helps you in choosing the perfect JavaScript unit testing framework in 2022 and beyond.
A testing framework can help you improve your software quality and catch errors early. To help ensure your JavaScript project is error-free, add Raygun Error Monitoring to your testing - and production - environments. Try it for free!