Webhooks for Raygun Alerting – Create custom third-party integrations
Posted Mar 8, 2022 | 5 min. (943 words)Since the introduction of Alerting to Raygun in late 2021, development teams have had more visibility into emerging issues than ever before. While the initial solution enabled you to get alert notifications by email, we knew that the next step was to give you more control over where you receive alerts.
When something breaks, you need to be notified natively in the tools you already know, use, and love. That’s why today we’re happy to announce webhooks support for Raygun Alerting. Now, you can create custom third-party integrations that connect Alerting seamlessly with Slack, Microsoft Teams, PagerDuty, and many more tools in your technology stack. By using webhooks, you can build a faster issue resolution workflow – decreasing the time for you to see an alert and, in turn, reducing the time that issues are in your user’s hands.
Introducing plan-level webhooks
Previously, webhooks were application-based, and only worked with Crash Reporting. This meant that you’d have to manually set up a new integration for every application in your plan (which many users have hundreds, if not thousands of).
In order to make integrations more scalable, we’ve shifted them to work on a plan level. Plan-level webhooks mean that you now only have to set up an integration once per plan and can then easily apply it across all of your Crash Reporting and Real User Monitoring alerts.
The payload structure for Raygun Alerting webhooks:
{
    // The type of event. Currently only supports the "Alert" type
    "EventType": "Alert",

    // A summary of the event
    "Text": "Alert: 20 test errors in one minute",

    // The time at which the event was triggered
    "EventTime": "2022-03-07T21:45:19.8929859Z",

    // Further information about this event, this example shows alert-specific data
    "Data": {

      // The alert that was triggered
      "Alert": {

        // The identifier of this alert
        "Id": "28w220q",

        // The identifier of the plan that this alert belongs to
        "PlanId": "26kcxb0",

        // The name of this alert
        "Name": "20 test errors in one minute",

        // Array of conditions on the alert. Currently each alert can only have one condition
        "Conditions": [
          {
            // Type of condition. For more information about condition types, see this document: https://raygun.com/documentation/product-guides/alerting-notifications/alerts/#alert-conditions
            "Type": "ErrorInstanceCount",

            // The interval over which this alert is evaluated
            "Interval": "OneMinute",

            // The threshold that must be exceeded in order for the alert to trigger
            "Threshold": 20,

            // Filters are additional requirements that must be met for the alert to trigger
            "Filters": [
              {
                // This filter reads as 'Error message contains the word "test"'
                "Type": "ErrorMessage",
                "Comparator": "Contains",
                "Value": "test"
              }
            ]
          }
        ],

        // Array of targets that this alert monitors. Currently only supports application-type targets
        "Targets": [
          {
            "Type": "Applications",

            // Identifier of the targeted application
            "Value": "13nqp6y"
          },
          {
            "Type": "Applications",
            "Value": "1bargc3"
          }
        ],

        // What actions will this alert perform when it is triggered
        "Actions": [
          {
            // "User" type actions email the specified user
            "Type": "User",
            "ActionSettings": [
              {
                "Type": "UserId",

                // Identifier of the user who will be emailed
                "Value": "1edli9i"
              }
            ]
          },
          {
            // "Integration" type actions currently only support webhooks
            "Type": "Integration",
            "ActionSettings": [
              {
                "Type": "IntegrationId",

                // Identifier of the integration which will be notified
                "Value": "26w20l2"
              }
            ]
          }
        ]
      },

      // Information about the trigger of this event
      "Trigger": {

        // Only present for error-specific conditions, ErrorGroups lists the errors which triggered the alert
        "ErrorGroups": [
          {
            "Identifier": "1i6khfhs",
            "Name": "Exception: test error"
          }
        ],

        // Identifier of the application which caused this event (e.g application which received the above errors)
        "ApplicationId": "41w20hy",

        // Name of the application which caused this event
        "ApplicationName": "Test App",

        // The time at which the event was triggered
        "TriggeredAt": "2022-03-07T21:45:19.8929859Z"
      }
    }
  }
Connecting webhooks to Alerting
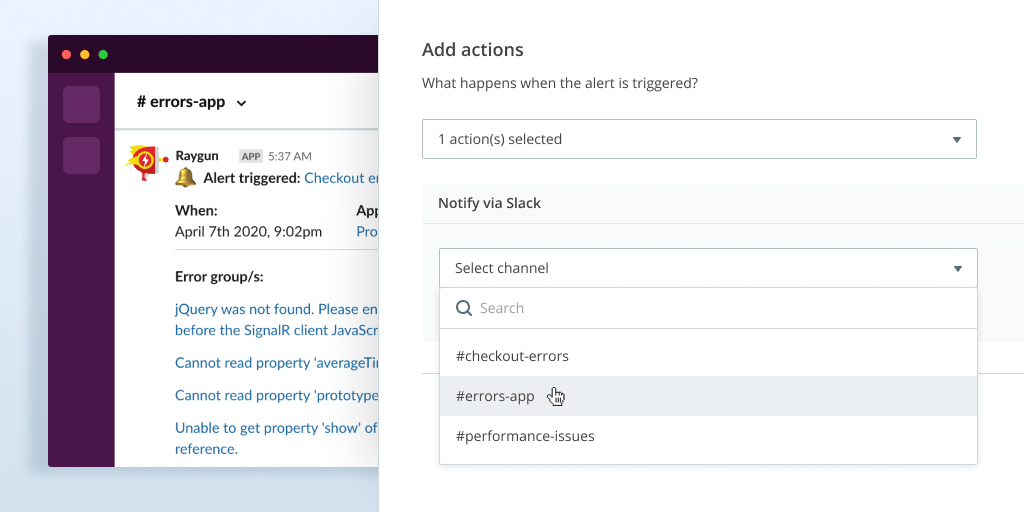
To get started, visit Alerting in-app, and begin creating an alert as you usually would. Once prompted to ‘Add action(s)’, click the dropdown and select ‘Send to webhook(s)’.
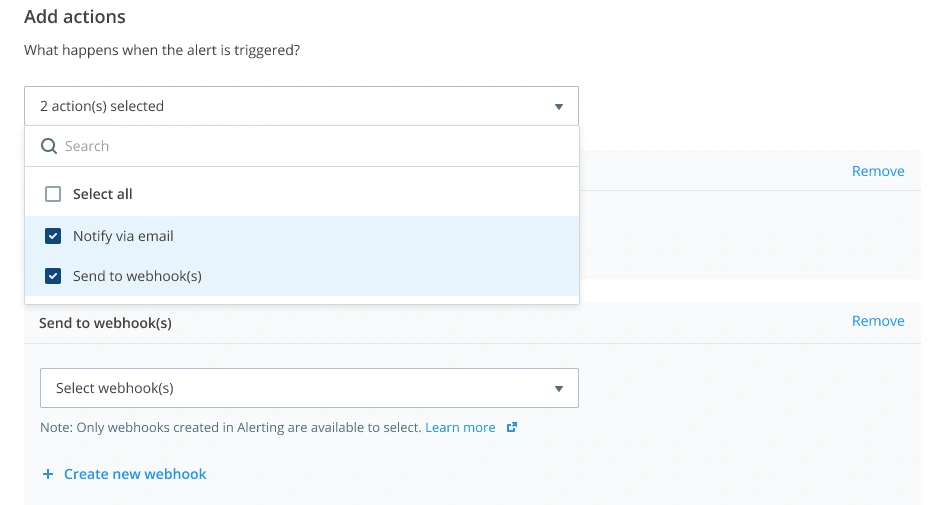
From here, you have the option to either select an existing Webhook (if you’ve already got one setup), or to create a new one. If the webhook is all ready to go, then that’s all you need to do, but for this example, we’ll create a new webhook.
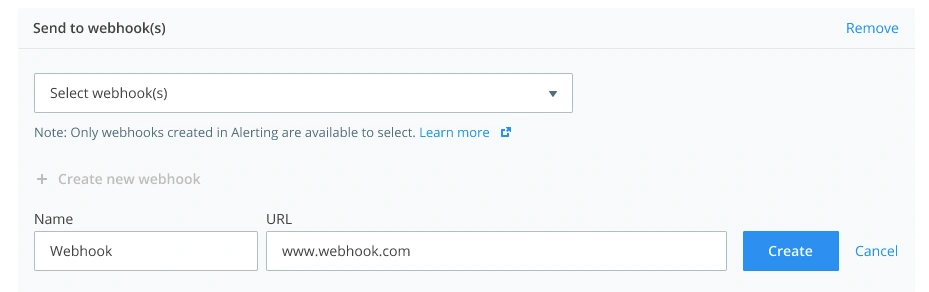
We suggest naming your webhook something relevant to the task you’re trying to achieve. For example, if you’re creating a webhook to send alerts to Slack, you could use the name “Slack alerts”.
You’ll then need to select what URL you’d like Raygun to send the alert information to. This could either be an endpoint within your system or an external tool like Zapier.
Once this URL is loaded into Raygun, you can click ‘Create’ and you’re ready to go. After this initial setup process, you can then select this webhook for any other alerts created in the future.
Getting setup for non-technical users
If you’d like to try webhooks out, but don’t have the technical expertise to create your own webhook endpoint, you can still get set up by using an integration tool such as Zapier.
Zapier allows you to easily create webhooks on its premium plan, removing the need to manually set up each integration individually. Instead, it’s able to automatically interpret data sent by Raygun allowing it to be translated into something understandable by third-party tools such as Slack or Microsoft Teams.
Get started today
To try webhooks for yourself, simply login to Raygun, head to the Alerting tab in-app, and start sending alerting data to the tools that you use most.
If you’d like to learn more about Raygun Alerting and how it can help to improve your issue resolution workflow, then you can visit our ‘Four Powerful Alerting Workflows’ webinar, available on-demand.